 Knitting Tips & Tricks
6 Easy Steps to Fix a Dropped Cast-on Stitch
Recreate A Dropped Cast-on Stitch
(in long-tail without turning your knitting)
Ever slog through a really, really long cast-on? It’s such a relief when you finally get all 300+ stitches cast-on AND the count is correct. Yay me, yay you! Boy that long-tail cast-on is looking so nice. You’re cruising through that first knit row when suddenly. it. happens.
“Seriously?” *hits head on table*
“Damn it!” *sobs on aloof kitty or confused significant other*
*Lifts freshly scratched face to yell into the void* “I’ve dropped a cast-on stitch.”
Cue dramatic music and of course screaming with breaks for creative language. It’s a knitting issue we’ve all had to deal with. Unfortunately, it usually means tearing out the entire cast-on and starting again. But not anymore!
You’re gonna love this. I’m teaching you how to quickly and easily fix that heart bursting cast-on mishap with written steps and a video at the end.
A Different Way
Okay, now before you go and think me a genius, know that the original idea is not mine. I saw a video posted by Patty Lyons that demos this very thing. (It was on social media so I don’t’ have the link). EXCEPT. . . I do it a little differently.
Where she has you turn your work around to recreate the cast-on stitch (it’s knit), I don’t. Nope, not for me. Turning the work around is just an opportunity for me to create more knitting screw ups. My method eliminates the need to flip your knitting around twice so it’s a little quicker. Both ways are so clever though.
What You Need To Try It Out
I suggest you try this out while reading the steps below. You can use a worsted weight or heavier yarn on a US #7 (4.5 mm) needle or larger. You just want to be able to clearly see what is going on with the dropped stitch and yarn. Honestly, this is easier than writing these instructions.
- Using the long-tail method, caston about 10 – 12 stitches.
- Knit 5 stitches.
- Drop the next stitch instead of knitting it.
Ready? Here we go.
6 Easy Steps to Fix a Dropped Cast-on Stitch
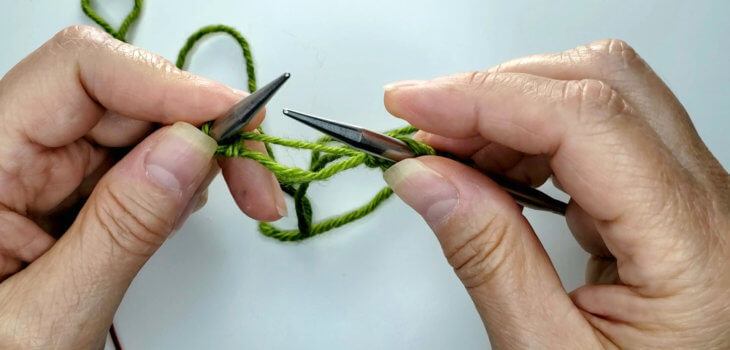
*Notice that dropping the cast-on stitch has left behind two horizontal strands. When ready we are going to use the strand in the front to purl our new cast-on stitch.
Step 1: Stop knitting. Take a deep breath.
Step 2: Pick up your knitting as if to continue knitting that first row, but don’t pick up your working yarn.
Step 3: Insert your Right Needle (other right if you are me) DOWN in between the horizontal strands – and lift up the back one. The back strand is now on your Right Needle and looks like a backwards yarn over (yo) with the longest leg in front of your needle.
We need to transfer this “yo” to the Right Needle and turn it into a twisted loop. Don’t worry you can do this step all in one motion.
Step 4: Use your pointer finger to hold the “yo” on the needle; move your Left Needle tip behind the yo and go UP into the yo, pull the Right Needle out. The yo has been transformed into a crossed loop on the Right Needle. Almost done!
Step 5: Now it’s time to use the remaining strand as our working yarn. Remember above when I said that there was the strand in the front? Insert your Right Needle purlwise into the crossed loop and use the strand in front to make a purl stitch.
Step 6: Transfer your new cast-on stitch back to the Left Needle.
Ta da!! You just fixed your knitting. Now you can finish knitting your first row.
If you would rather watch my Knitting Quickie Video featuring how to fix a dropped cast-on stitch, here it is. There is no talking in this video, just soothing music. Sound is not needed, but having it on or off is up to you.
You can use this to fix a project with any number of cast-on stitches, or for knitting in the round. It’s truly a lifesaver with a longer cast-on.
Do you have another way of fixing a dropped cast-on stitch? If so, I’d love to hear all about it in the comments. Please go ahead and share it with us.
